1 Comment

Raspberry Java Ribs

Raspberry Java Ribs Promo Pic.png

My love for the Sunday pastime that has become football was a fire that burned slowly before resembling the inferno that it is today. Many recent changes have added fuel to that fire. First and foremost is my young son’s involvement in youth football. Seeing his passion for the sport grow with every weekend has been a real joy. He has seen that his hard work and dedication pay dividends. It is a special moment for a parent.


Living in a city that actually has a professional football team has contributed as well. Growing up in Southern California, we witnessed a myriad of pro teams sweep in then sweep away. It was hard to establish roots with both the Rams and Raiders as they jumped from city to city, the Chargers were in San Diego and the 49ers were in San Francisco. Having a pro team in town and one that is successful, like the Falcons, has given me a vested interest in watching on Sundays. And I thank you in advance for not mentioning last year’s Super Bowl.


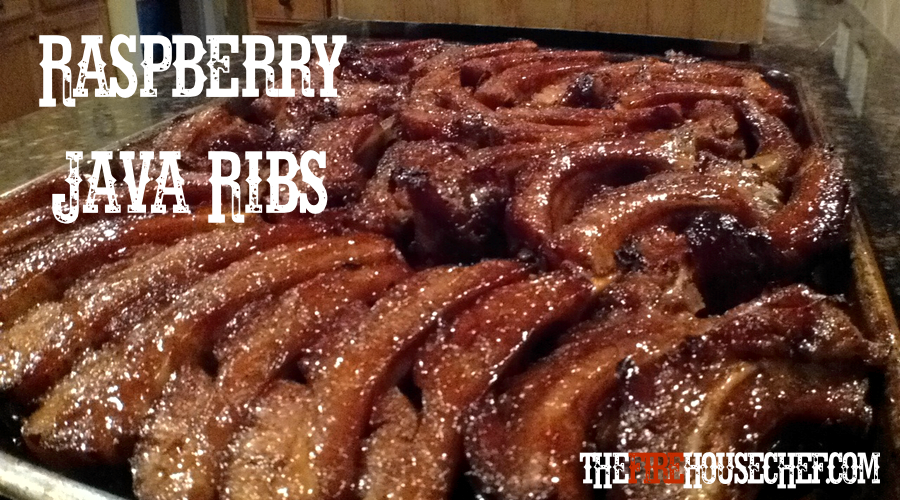
Which brings me to the topic of today, how best to feed one’s self and those who stand beside him/her as they lament the days losses? My go to meal for football are ribs. ‘Football food’ should be of the finger variety, fulfilling the meat quotient, and requiring mostly unattended cooking. Ribs do this in spades. Rain or shine, on the grill or in the oven, dry versus wet? All these questions are arbitrary but allow me to direct to what I consider football ‘nirvana’ with this deep and complex raspberry java barbecue sauce. Indulge…


A few after the fire critiques: This recipe suggests an oven which has more control over temperature fluctuations then the grill or smoker which is exposed to the outside weather but feel free to use this on either. If you have a Trader Joe’s anywhere near you, do yourself a favor and use their raspberry jam for this recipe, it’s amazing. Don’t want the coffee grounds? Replace with 2 Tbsp. of strong coffee.


Fuel


Ribs and Dry Rub


Baby Back Ribs (3 medium racks)

Brown Sugar  (½ Cup)

Salt (¼ Cup)

Pepper (2 Tbs.)


Barbecue Sauce


*Rib Juices (1 Cup)

Orange Juice (2 Cups)

Ground Coffee or Espresso Powder (2 Tbs.)

Chipotles (3-4 Minced)

Raspberry Jam (1 Jar or 16-18 ounces)

Brown Sugar (½ Cup)


* see recipe for directions


Tools


Baking Sheet

Dutch Oven

Fine Mesh Strainer

Aluminum Foil

Various Bowls

Spatula

Brush


Tactics


Pre-heat oven to 275°F. Mix dry rub ingredients in a bowl and reserve. Rinse the ribs under cold running water. Dry with paper towels, clean of any loose meat/skin and then apply the dry rub liberally to all sides of the racks. Wrap the racks tightly in foil meat-side down ensuring the seams rest on the top of the racks. Place the racks on the baking sheet, place in the middle of the oven and cook for 3 (three) hours. Remove the racks from the oven, open one foil packet and drain the juices into the Dutch oven (roughly a cups worth). Remove the other two racks from their foil, discard the juice and place the racks side-by-side back onto the sheet and place in the oven for an additional hour.


Meanwhile, place the Dutch oven over medium heat and add the coffee, chipotles, orange juice, raspberry jam and brown sugar and mix to combine. Bring the sauce to a boil then reduce to a simmer. Simmer for 15 minutes. Remove from heat and pour the sauce into a bowl through a fine mesh strainer. Repeat ensuring that all chipotle and raspberry seeds have been removed. Note that most, but not all coffee grounds, will be removed, which is to be expected. Bring the sauce back to a boil and reduce to a cup and ½. Quickly place the sauce into a chilled bowl and stir the sauce until cooled and thickened.


Remove the ribs from the oven and apply a coat of sauce to all sides. Place back into the oven and cook for 15 minutes or until the first coat sets. Repeat for a total of 4 (four) coats an additional hour. Remove the ribs from the oven and allow them to cool to the touch. Once cooled, slice the racks into individual ribs, place in a flat single layer on the sheet exposing the sides, and apply a coat of sauce. Place under the broiler set to LOW and caramelize (5-6 minutes). Flip, apply and broil. Serve immediately. Your welcome…

1 Comment

Comment

Pull-Apart Rolls

Pull-Apart Rolls Promo Pic.png

Holidays make me appreciate the aromas from the kitchen like no other time. Be it succulent meats, warmed spices, or baked goods, we inevitably find ourselves being drawn towards the gastronomical pull of the kitchen. So in an effort to boost the wonderful gravity of these happy smells, let’s make some bread.


For most, bread making can be daunting task. Weighing ingredients, moisture levels in the house, time demands… These are all roadblocks most people lean on to not try bread making during this most wonderful time of the year. Don’t let this dissuade you from giving this a go. This is a forgiving recipe and a great gateway dough towards more advance yeasty breads. So lather up with some butter cause we are about to be on a roll!


A few after the fire critiques: these are best straight out of the oven but they can be stored for a week at room temp, a month in the fridge or frozen for quarter the year. I’d suggest a flavored butter or fruity jam to top these with but these are so good you really don’t need anything.


Fuel


4 Cups All-Purpose Flour

1 Cup Buttermilk

¼ Cup Water, lukewarm (100-110°F)

¼ Cup Sugar

8+ ounces/1 stick Unsalted butter, melted and cooled

1 package Active Dry Yeast

2 Eggs

2½ tsp. Salt


Tools


Stand Mixer

9-by-13 Inch Baking Dish

Large Bowl

Plastic Wrap


Tactics


Brush a large bowl with butter. Place the water, yeast and a pinch of sugar in the bowl of the stand mixer fitted with a paddle and mix to combine. Let it stand for 10 minutes to get foamy. Add the buttermilk, melted butter, eggs and remaining sugar and mix till combined. Switch to a dough hook and add the flour and salt. Knead at a low speed for about 2-minutes or until it forms a smooth ball. Scrape the ball into the prepared large bowl and cover with plastic wrap and let it stand in a warm place until doubled in volume, about 1½ hours.


Pre-heat the oven to 350°F. Grease a 9-by-13 inch baking dish. Place the dough out onto a lightly floured surface and work into a ball. Cut in half, then slice each half into 7 wedges and arrange them into the prepared dish. Cover with plastic dish and let it stand in a warm place until it doubles in size, about 30 minutes.


Bake the rolls for 20-25 minutes or until golden. Serve warm or at room temperature. Indulge.

Comment

Comment

Savory Stuffed Pumpkin

The holidays are coming and the delight and/or pressure of serving many a worthy dish comes with it. As with all firehouses, this time of the years brings our families together to celebrate all things life has to offer outside of the fire service. Chief among them is food. What I offer you here is an impressive vessel that celebrates the season and many a mouth in a Holiday table-stealing stunner.


This is an essence a stuffing but cooked in a moisture-locking gourd instead of a casserole dish or Dutch oven. With this artisan style baking vessel imparting the orange-fleshed flavor, the advantages are many; one ‘pot’ cooking, no filling restrictions, serves many and has an easy clean up. This will take a permanent place in your holiday meal rotation.


A few after the fire critiques: As I stated above, your imagination is your only limitation with what you can stuff in here. Don't want rice; add quinoa, coucous, or cubed bread in its place. Remove the protein (sausage) and dairy to make it a vegetarian dish. You can even consider making it a sweet version as well... Oh, and the pumpkin travels. Wrap in aluminum foil on a baking sheet or large plate and take with you to your next holiday party. Simply reheat in a 350°F oven until warmed through and serve.


Fuel


Medium to Large Pumpkin (8-10 lbs.)

1-2 Cups of Rice, cooked

1 lb. of Sausage, cooked

1½ Cups of Cheese, cubed (Gruyère, Emmental or White Cheddar)

2 Cups Heavy Cream or Half-n-Half

4-6 Cloves of Garlic, roughly chopped

2 Tbsp. Thyme, minced

1 Tbsp. EVOO

1 tsp. Cinnamon

½ tsp. Nutmeg

½ tsp. Smoked Paprika

½ tsp. Cayenne

Pepper and Salt


Tools


Mixing Bowls

2 Baking Sheets

Parchment Paper or Slit Pads

Cast Iron Pan


Cooked to perfection.

Cooked to perfection.

Tactics


Pre-heat oven to 350°F. Carve a large enough hole into the top of the pumpkin to allow a large serving spoon to fit in. Remove the seeds, innards and top and reserve for later. Wipe down the pumpkin inside and out ensuring there are no strings. Season the inside of the gourd with salt and pepper. Combine the heavy cream, 1½ tsp. thyme, cinnamon, nutmeg and salt and pepper in a mixing bowl and reserve. Add the rice, sausage, cheese and cream mixture into the pumpkin and mix to combine.


Place the pumpkin in the middle of the parchment lined baking sheet and ensure the top has been put back on. Place in the oven for 1½-2 hours (or more depending on the size of your pumpkin). Remove the top of the pumpkin and using a knife, check the doneness. When the knife penetrates with little resistance, remove the top and continue to cook for an additional 20-30 minutes. Remove and reserve. Turn the oven OFF and place in prepared pumpkin seeds (see below).


To prepare the pumpkins seeds, place the innards in a large mixing bowl in the sink and add enough water to cover. Remove the strings while rinsing the seeds and place on a paper towel lined baking sheet to dry. Place the cast iron pan over medium heat. Add 1 Tbsp. of EVOO, smoked paprika and cayenne in and heat for 30 seconds. Add the pumpkin seeds and cook stirring often for 8-10 minutes or until slightly browned. Remove from heat, season with a pinch of salt and reserve. Dry the baking sheet, line with parchment paper and place the seeds on top. Place in the oven after the pumpkin has finished cooking and cook with the carryover heat for 10-15 minutes or until dry and crunchy.


When ready to serve, use a large serving spoon and gently scrap the inside of the pumpkin to release some of the flesh and stir to incorporate. Either place a generous scoop into serving bowls or cut a wedge of the pumpkin and carefully place on a plate ensuring the contents remain. Top with reserved thyme and pumpkin seeds and indulge!

Comment

Comment

Pumpkin Bread Pudding

Pumpkin Bread Pudding Promo Pic.png

All Hallows Eve is quickly becoming my favorite holiday. I realized this when I recently went down to my basement to gather all my ghoulish decorations and my traditionally Christmas decorations looked as though they had some competition. This feeling was reinforced when my son and I were staging our front lawn and a car slowed down in our cul-de-sac and the back window rolled down and a young little Princess politely asked when our Halloween house would be ready? The young girl’s mother then chimed in that we are known for having the best Halloween decorations in the neighborhood… score.


So, we traditionally set up a fire pit in the middle of the cul-de-sac for all our neighbors to sit around as we dish out treats to the 1,000+ people that come far and wide to haunt our streets. It is a delightfully entertaining night to see all the colorful and creative costumes but it is also taxingly long what with refilling the candy cauldron, scaring prowlers away from the decorations and keeping tabs on my own ghouls (sounds like the average shift with the crew). So, my goal is to provide a Halloween themed dessert to keep all the parents happily stuffed.


My love for bread pudding and pumpkin pie is well chronicled so I felt compelled to try and combine the two together. The result was quite surprising. The dish offered the homey decadence of bread pudding crossed with the creamy, spiced pumpkin flavor. And for the piece-de-resistance, top the pudding with a quick caramel sauce, it will be guaranteed to be the talk of the night.


A few after the fire critiques: for those in the hunt for all things natural, you can secure some sugar pumpkins to roast, scoop and puree en lieu of using the canned variety but it is not necessary. When selecting a good canned pumpkin, make sure it is NOT pumpkin pie filling (disaster). I have been known to reduce the pumpkin puree on the stovetop to remove much of the water content and deepen it’s inherent flavors, a fun twist to mix it up. Lastly, this can be made ahead of time and rewarmed in an oven before serving, always a plus.


Fuel


Pumpkin Bread Pudding


Canned Pumpkin (15 ounce can)

or

Roasted Pumpkin (Sugar Pumpkin or similar, 1-2)

Challah Bread (French of Sour Dough are fine)

1 Cup Heavy Cream

1 Cup Whole Milk

2 Eggs (Beaten)

1 Cup Brown Sugar

1 Tbsp. Cinnamon

2 tsp. ground Allspice

2 tsp. ground Nutmeg

1 tsp. Cloves

1 tsp. Vanilla


Quick Caramel Sauce


¼ Cup Unsalted Butter (at room temp.)

1 Cup Brown Sugar

½ Cup Heavy Cream

1 tsp. Salt


Tools


7” x 11” Baking Dish

Various Bowls

Small Sauté Pan

Medium Saucepan

Spice/Coffee Grinder

Whisk

Spatula


Tactics


Pumpkin Bread Pudding


Preheat oven to 350°F. Cut bread into ¾” thick slices and then into bite size pieces. Place the pumpkin puree, heavy cream, milk, eggs and brown sugar in a large bowl and mix to combine. Add the spices (allspice, cinnamon, clove and nutmeg) and vanilla and mix to incorporate. Toss bread cubes into the bowl and gently toss to coat. Carefully pour the pumpkin bread into the baking dish and set aside for a minimum of 15 minutes or up to all night. Place in the middle of the oven of 35-40 minutes or until a toothpick is drawn clean from the middle. Place on a rack to cool. Slice into 3”x 3” cubes and serve with powdered sugar and quick caramel sauce.


Quick Caramel Sauce


Place a medium saucepan over medium heat. Add the butter and brown sugar and allow the butter to melt. Stir for 2 minutes until the sugar crystals dissolve. Add the heavy cream and stir for 1 minute. Bring the sugar to a gentle boil for two minutes and then remove from heat. Allow it to cool and use immediately or store for up to a week.

Comment

1 Comment

Onion Tart

Onion Tart Promo Pic.png

As I pondered the upcoming weekends filled with the American pastime of eating and watching football (and the EPL, go Man U!), I reviewed some of my favorites. While considering some of my recipes, they needed to hit a few basic criteria; must be handheld, be easy to make requiring as little time away from the big screen as possible, indulgent tasting but inexpensive and above all else, a crowd pleaser. Enter the Onion Tart.


This is recipe that like most started with a great woman, my Mom. She shared this with us many moons ago during a holiday visit and it struck a cord with all attending. It should speak volumes that this dish can be placed on a turkey-laden holiday table and stand up to all it’s competition. My wife then got a hold of it determined to make it a family affair and this is what she finished with. Crunchy, savory, slightly sweet, aggressively seasoned, this hits all the benchmarks (as does my wife). Wherever you are, whomever you are with, enjoy the football season!


A few after the fire critiques: Créme Fraîche is must here and can now be found readily available in most major grocery stores. It’s the subtle sour notes that make it so popular in both savory and sweet dishes but it is it’s fat content that makes it a star. Adding this to anything from soups and sauces will offer the creaminess one seeks but without it breaking or curdling. We regularly stock this in our fridge, a great find.


Fuel


1 Bag of Pre-Made Pizza Dough

2 Sweet Onions, sliced

2 Cups Portabella Mushrooms, sliced

8 ounces of Créme Fraîche

4-5 Slices of Bacon

1 Sprig of Rosemary, chopped

4 Tbsp. Olive Oil (AKA- OO)

1 Tbsp. Dried Parsley

2 tsp. Garlic Powder

Pepper and Salt to taste


Tools


Baking sheet (quarter or smaller)

Sauté Pan, large

Various Bowls

Plastic Wrap

Paper Towels


Tactics


Place 2 Tbsp. OO and the dough in a bowl insuring the dough is covered in the oil then cover with plastic wrap. Let it proof while preparing the remaining ingredients.


Preheat the oven to 350°F. Place the baking sheet topped with the bacon in the middle rack of the oven and cook until par-cooked, think slightly firm but not crispy (check often please). Place onto paper towels to drain then chop into bite size pieces, reserve. Whip out all but a Tbsp. of bacon grease and reserve baking sheet.


In a sauté pan, place the reserved Tbsp. of bacon grease over medium heat. Add the chopped onions, the dried parsley, garlic powder, Tbsp. of water and an aggressive pinch of salt and cook until slightly browned, 12-15 minutes. Remove from heat and reserve. Increase head to medium-high and add remaining OO, mushrooms and pinch of salt and cooked until slightly browned, 8-10 minutes. Remove from heat and reserve.


Increase oven temperature to 350°F. Gently stretch the dough on top of the baking sheet ensuring to reach all the corners while attempting to achieve a level thickness throughout. Lather the crème fraîche on top and then evenly place the bacon, onions, mushroom, rosemary and sprinkle with pepper and salt. Place in the middle rack and cook until bubbly and browned, 16-20 minutes. Cool for 5 minutes, slice and then serve, indulge!

1 Comment

Comment

Horchata

After another sweat-drenched day of making hot laps on the interstate inside a fire engine with questionable cooling capability, a refreshing summer drink hits the spot. Yes, yes, yes, electrolyte charged drinks have their time and place but in 2017, we want more control over what we place into our bodies. And as I’ve always been partial towards Latin inspired cuisine, its no shock to see me gravitate towards the Mexican version of their classic rice based sweetened beverage called Horchata.


Horchata means different things to different parts of the world; it all depends on the cultural traditions (just like the fire service). Some use peanuts, cashews, almonds (as I do here), sesame seeds, tigernuts, etc. But no mater the regional ingredient, horchata has the basic tenants of water, grains/nuts, cinnamon and sugar all brought together in glass and ice.  It’s magic.


A few after the fire critiques: We’ve essentially made rice milk here but with an aggressively flavored slant, welcome to the world of homemade milks! Agave is used as the sweetener here but feel free to use any that you like. I’ve used honey in the past but some find it too strong. Many will also mix the horchata base and milk in a cocktail shaker before pouring into a glass and this works well but good luck finding that in the firehouse. Lastly, for your more pretentious guests (I’m raising my hand here), consider frothing some milk or cream to top the drink and a fresh grating of nutmeg for that little something extra.


Makes 2+ quarts


Fuel


6 Cups Water

1 Cup Rice

½ Cup Almonds, slivered

1 Cinnamon Stick, broken up

2 Cups Milk

½ Cup Agave

1 tsp. Vanilla

1 tsp. salt

Cinnamon Powder to taste


Tools


Baking Sheet

Blender

Large Pitcher

Fine Mesh Sieve

Cheesecloth


Tactics


Mix rice, almonds and cinnamon stick to combine than place evenly onto the baking sheet. Place in a 350°F oven and bake for 10-15 minutes or until slightly toasted. Add toasted mix with water into the blender and blend for 5 minutes. Pour into the pitcher, add vanilla and agave and stir to combine. Place horchata mix in fridge for 8 hours or over night.


When ready to drink, pour horchata mix through the fine mesh with cheesecloth into a glass filled with ice, fill it ⅔ of the way then add milk near the top. Mix with a spoon or straw and top with a dash of cinnamon. Indulge!

Comment

Comment

Not Your Mama's Watermelon Salad

Watermelon signifies all that is glorious about summertime. Abundant, inexpensive and most importantly refreshing, this fruit from the gourd family is hitting the sweet spot for most every American this time of year to help us cope with the heat. And hot it is!


As we’ve all been down the tried and true path of eating it straight from the rind, I wanted to present a path less traveled. Sure, many of us have had watermelon in salads a plenty, be it with other fruit or with feta and mint, this recipe stretches what we are comfortable with when it comes to our shared safe zone with this red vessel. Soy, chili, garlic, cilantro, and pistachio… can it get any stranger? But I haven’t led you down a path I haven’t already walked myself so trust that I won’t lead you astray. Come join me down this different but fun path that is not your Mama’s watermelon salad.


A few after the fire critiques: The salting of the melon and cucumber (it needs to be an English cucumber) can be skipped if in a pinch for time, however, this really helps strengthen their inherent flavors so just do it. Chili garlic sauce can be substituted with Sambal (less garlic) or Sriracha (less heat) if you can’t find it. Pistachio is THE go to nut for this recipe but more price friendly almonds are good as well.


This recipe was inspired by Kim Severson


Serves 6-8 as a side


Fuel


4 Cups Watermelon, ½ inch cubes

3 Cups English Cucumber, peeled, seeded and sliced into ¼ inch strips

3 Tbsp. Lime Juice

2 Tbsp. Soy Sauce

1 Tbsp. Chili Garlic Sauce

⅓ Cup Cilantro, chopped

⅓ Cup Pistachios, chopped

Pepper (be aggressive) and Salt (to taste)


Tools


Whisk

Spoon

Large and Small Bowl

Baking Sheet

Metal Rack

*Colander (if you can't find a rack)


Tactics


Combine watermelon and cucumber and place on rack over a baking sheet or colander. Salt generously and cover with plastic wrap and refrigerate for 30 minutes or up to 4 hours. Remove and transfer to a large bowl.


In a smaller bowl, add lime juice, soy sauce, chili garlic sauce and whisk to combine and pour over cucumber and watermelon. Add cilantro, pistachio, pepper (aggressively) and salt to taste and toss gently. Can be served cold or at room temperature. Indulge!

Comment

Comment

Antipasto Pasta Salad

With the sounds of children celebrating summer’s sweet release from school often lead me towards thoughts of lounging poolside with some delicious salads to munch on while tanning under the southern sun. While often on the move and always in a hurry…

With the sounds of children celebrating summer’s sweet release from school often lead me towards thoughts of lounging poolside with some delicious salads to munch on while tanning under the southern sun. While often on the move and always in a hurry to relax, pre-made salads are one of my go to dishes when heading towards the concrete and water. Make the day before or right before one heads out the door, these are an easy and forgiving meal that delights a crowd.


Pot luck dinner, picnic in the park or the tiptoeing sands of the beach, pasta salads are a must. With this iteration, I wanted to take all the flavors of a classic Italian antipasto; cheeses, meats, olives, etc., but mix it with pasta to offer more substance and stretch the cost. It’s Italian oxymoron in a bowl, indulgere!


A few after the fire critiques: You can use any cured meat that you’d like in place of the pepperoni, have fun. Same goes for the cheese, just ensure it is a soft cheese. When in season and at their peak, I often add ripe cherry tomatoes for bursts of acidity and color. For the heat seeking adult crowd, I’ll often add hot & sweet cherry peppers, one of my go to toppings for pizza. Lastly, if you are intending to serve table side for extended periods (i.e.- an outdoor lunch), remove the mayo from the recipe and you’ll be good to go.


Fuel


Pasta 1 lbs., tricolor spiral or similar

Pepperoni ½ lbs., chopped into ½” cubes

Mozzarella Cheese 6-8 ounces, chopped into ½” cubes

Bell Pepper, large, chopped (½ Red and Orange preferred)

Purple Onion ½ diced

Kalamata Olives ¼ Cup, quartered

Basil 6-8 large leaves Chiffonade

Italian Dressing 1 Cup

Mayonnaise 1 Tbsp

Pepper and Salt


Tools


Large Pot

Colander

Large and Small Bowl (2)

Fine Mesh Sieve

Whisk


Tactics


Place the pasta in the large pot, cover with water and large pinch of salt and bring to a boil over high heat. Meanwhile, place sieve in small bowl and cover with cold water (and a few ice cubes if you have them). Place the onions in the sieve and let it sit for 5-10 minutes then drain. In a large bowl, place the pepperoni, cheese, bell pepper, onion and olives then mix to combine. In a small bowl, combine Italian dressing and mayo into thoroughly mixed. Once pasta is al dente or cooked till your liking (8-10 minutes), drain and place back into warmed large pot. Place ½ the dressing in with the pasta and mix to combine. Place in fridge for 15-20 minutes ensuring that you mix every 5 minutes. Remove the pasta from fridge and place in the large bowl, pour the remaining dressing, add basil, pepper and salt and mix until combined. Taste for seasoning and adjust where needed. Can be served at room temperature for a short period or served cold. Indulge!

Comment

Comment

Homemade Tortillas

Not much speaks to me like the freshly made, warm tortilla, nada. Memories of the food I grew up with in California often comes rushing back with every bite as I eat them full of shredded pork, beans and rice or my favorite way, stuffed with avocado. Serving as the ultimate vehicle with which to serve a multitude of eccentric items, this is the pinnacle of street food vehicles.


I’m not intending to place any shade on this recipe, but it does take a little time, patience and some experience to make these. Go easy on yourself while following the recipe and play with the ingredients to see how it best works for you. My wife and I (this really is her recipe here as she has perfected them) have learned through trial and error some of the roadblocks to avoid and when to throttle the gas (i.e.- adding the water, see below). When you hit this right, you’ll never but premade again, that’s a promise.


A few after the fire critiques: You’ll notice that I placed the weights next to the amounts. This is for consistency, as any true baker will tell you, as my cup of flour may be different then your cup of flour. I’ve used other oils over the years; olive, corn, etc., just ensure it is a neutral oil with the noted exception of grape seed oil, it just wasn’t good.


Fuel


3 Cups (405g) All Purpose Flour

1 Cup Warm Water

1/3 Cup (80g) Vegetable Oil

1 Heaping Tsp. Salt

1 Tsp. Baking Powder


Tools


Stand Mixer w/ Dough Hook

Cast Iron Pan

Rolling Pin

Tongs

Scale


Tactics


1.     Combine the flour, salt and baking powder in the bowl of the stand mixer. With the dough hook attached, mix all the dry ingredients until well combined. Set the mixer to medium then add the oil and ¾ of water and monitor if more needs to be added. Mix for one minute, stopping several times to scrape the sides of the bowl. After about one minute, or when the mixture comes together and begins to form a ball, slow the speed to low. Continue to mix for one minute or until the dough is smooth.

2.     Place the dough to a well-floured work surface. Divide the dough in half, then in half again. Continue until you get 14 (50g) equal portions for small tacos or 23 (30g) for street size tacos. Form each into a dough ball then cover them with a clean kitchen towel or plastic wrap and let them rest for 15 minutes.

3.     After letting it rest, heat a cart iron pan over medium-high heat. Roll each dough ball into a rough circle, about 6-7 inches in diameter making sure to keep the working surface and rolling pin lightly floured. Stack the uncooked tortillas with some wax paper in between each to avoid them becoming soggy.

4.     When the pan is hot, place one of the tortillas into the pan and allow them to cook for about one minute or until the bottom surface has a few pale brown spots. Similar to pancakes, you’ll begin to notice a few little bubbles. Flip to the other side and cook for about 30 seconds. You’re looking for the tortillas to remain soft but have a few small pale golden brown spots on the surface.

5.     Remove with the tongs and store in a covered container or zippered bag. Eat now and serve warm or allow them to cool for later use. When ready to eat later, microwave uncovered for 15-second increments (or until warm), then cover to hold the heat. Store in the same containers as listed above as they will last for a few weeks, if you don’t eat them all first.


Comment

Comment

Broccoli & Cheese Soup

Winter is here! Much warmer a winter then I had anticipated, but that won’t stop me releasing a great cold weather recipe like the classic Broccoli & Cheese soup. This recipe is near and dear to my heart as it brings me back to my days of strolling down the paths of my favorite place to experience Southern California with my family, Disneyland. Outside if the crashing waves of my beloved Southern California shore, Disneyland is what I think of most when people ask me about my time spent growing up there. On a side note, I’d also consider retiring there and working with the Disneyland Fire Department, which I came to find out, is comprised of mostly retired Southern California Firefighters. What a job!


More specifically with this recipe, Broccoli & Cheese soup was a staple that my family and I would look forward to when visiting the Disneyland California Adventure Park. Inside the park was a recreation of Fisherman’s Wharf located in San Francisco the way only Disney can do including the great bakery and soup restaurant, The Pacific Warf Café. The warm and comforting soup in a bread bowl was a fantastic way to dust off the chill of the night and sit back and enjoy the great atmosphere. Sharing this recipe with you is my hope to recreate the same sense of warmth and comfort when spending time with your family or crew. Indulge!


Some after the fire critiques: Before you ask… Yes, most broccoli and cheese soups contain milk, half & half or heavy cream, but I’m trying to keep the soup light and with a Latin flair. Same thing with the sliding scale on the amount of cheese, add to taste. But when at home and not operating heavy machinery, substitute a cup of the chicken stock with a nice beer or dairy (milk, half & half or heavy cream). I recommend something with some dark, bold flavors like an IPA or stout.


Fuel


Broccoli (roughly 3 cups as follows:)

·      Florets (2 cups, chopped)

·      Stems (1 cups, peeled and chopped)

White Cheddar Cheese (2-4 cups shredded)

Canadian Bacon (1 cup, chopped)

Poblaño (charred, peeled, de-seeded and chopped)

Onion (one medium and chopped)

Potato (1 cup chopped)

Garlic (2-3 cloves chopped)

Chicken Stock (4 cups)

Cumin Seed (1 tsp. toasted and ground)

Butter (2 Tbs. cubed)

Flour (3 Tbs.)

Pepper and Salt to taste


Tools


Dutch Oven

Spice/Coffee Grinder

Slotted Spoon

Aluminum Foil

Tongs


Tactics


Place the poblaño over direct flame on the stovetop. Char on all sides then loosely wrap in aluminum foil and allow steaming for 10 minutes. Place the poblaño under running water and peel the skin, split open the poblaño and remove the seeds (and veins if you don’t want it to be too spicy) then chop into bite size pieces. Meanwhile, toast the cumin seeds in a small sauté pan over medium heat and toast until slightly browned and their aroma is strong. Remove from heat and grind until a fine powder.


Place the Dutch Oven over medium-high heat. Place the Canadian bacon in and brown for about 5-8 minutes. Remove with slotted spoon and place on a paper towel lined bowl. Put onion in and cook for 5-8 minutes or until translucent.  Add Garlic and cook for an additional 30 seconds. Make a small well in the middle of the sautéed vegetables then add butter. Melt butter then add the flour then mix until incorporated and cook for an additional 3 minutes (to remove the flour taste). Pour in the chicken stock and deglaze the bottom (use the spatula to scrap the bottom to remove the goodness). Add the potato, broccoli stems, poblaño and cumin, and stir to combine. Bring the soup to a boil then reduce to a simmer and cook for 20 minutes. Add the broccoli florets, Canadian bacon and cheddar cheese then mix to combine (and melt cheese). Pepper and salt to taste. Enjoy.

Comment

Charred Corn and Jalapeño Salad

Comment

Charred Corn and Jalapeño Salad

Here in the south, the abundance of locally sourced fresh produce still amazes me. With a decade+ in Georgia clocked in on my odometer, I never tire driving by the many green farm lands and the diverse crops they offers. With so many vegetables, fruits and grains available, inspirations for inventive twists on culinary favorites are the norm now, not the exception. All one must do is take a drive down famed Buford Highway or dive into Atlanta to find out this is true. It’s a misnomer that all southern recipes are slow cooked, time honored affairs full of flavorful rendered fats and handheld edible mops to clean it up with. No longer is fried chicken, biscuits and gravy the heralded trinity as we’ve moved towards farm-to-table eating. So should it be at the firehouse. 

I remember fondly the innocent ignorance as a displaced Californian settling into my new home in the south expecting what is often perceived the ‘southern’ culture when it comes to food. It was through this culinary baptism that my want to improve my skills in the kitchen was truly begun. The love affair with the land in the south is one to cultivate nationally as we strive to improve our sourcing for fresh, organic foods. So I implore you to seek out the local equivalent to ‘farm-to-table’ near your firehouse. It was through this yearning and my marriage of west and south that has fueled this want to bring my upbringing and current locale to the kitchen table. Thus the Charred Corn & Jalapeño Salad was born.

This is a speedy, composed side dish will carry you through the peak summer season of fresh corn and peppers highlighted with the zest of lime, earthiness of cumin and the herbaceous notes of basil. Served cold, room temp or hot off the fire, this is a multi-tool dish as adaptable as your trusty haligan. As a born and breed Orange Countian, I appreciate quick, fresh takes on food as we were always on the go. This still drives me today as time at the firehouse can come quick and without forgiveness as the clock moves forever onward so enjoy!

Fuel
Corn on the Cob (3-4)
Jalapeños (2-3, diced)
Basil Leaves (15-20)
EVOO (2 ounces)
Lime Juice (1-2 ounces)
Honey (1-2 ounce)
Cumin (1/4 tsp)
Pepper and Salt to taste

Tools
A medium bowl
Kitchen prongs

Tactics

Place the corn and jalapeños on the stove top directly over high heat turning them with the prongs to achieve an equal char, 2-3 minutes (sometimes longer). Place them on the cutting board and loosely cover with aluminum foil for another 5 minutes. For the jalapeños, remove the charred flesh with a paper towel or under running tepid water then dice and reserve. For the corn, cut the tail end of the cob off to create a flat (and safe) surface and place in the center of a medium bowl. Remove all the kernels carefully with your blade. Note that the flavor of the corn really is at its core, so take the time and the dull end of your blade and run it down the cob to get ever last bit of flavor. Place the basil onto the cutting board and stack the leaves, rolling them tightly, and then slicing the leaves perpendicular to the roll (AKA- Chiffonade). In the medium bowl of kernels, place the EVOO, lime juice, honey and cumin and mix to combine. Add the jalapeños, basil and pepper and salt to taste. Indulge. 

Some after the fire critiques: Jalapeños are like snowflakes, no two are alike. Some are as benign as a green pepper while others give the habanero a run for its money. As the cook, it’s your responsibility to take the ‘temperature’ of this pepper before serving it. I take the Goldilocks approach: want it hot, leave it as is; flesh, veins, seeds and all. Want it cooler; remove all the capsaicin via the seeds and any white veins attached to the inner wall of the pepper. Want it just right, just remove the seeds. Also, consider substituting cinnamon for cumin to make the salad more thought provoking and give the guys a different twist as cinnamon pairs well with basil. 

Comment

1 Comment

Cedar Plank Salmon

With all the sprouts spawning green leaves and the smell of fresh growth in the air, I often am drawn to bring a little nature into the kitchen. This often leads me to find any excuse to cook with natural wood, which delivers that subtle earthiness and structured tannins. I find the best way into the world of wood in the kitchen is Cedar Plank Salmon. This is a time-tested technique that draws you out to nature to cook on the grill, the way it’s meant to be.


Often the issue with many is the cost of purchasing the planks of wood (there are many more then just Cedar) from specialty stores or online gourmet sites. The simple solution is to drive down to the local home improvement store and purchase an untreated board and cut it to your desired length. Once acquiring the board, the only question is whether to grill it or roast it in the oven?


A few after the fire critiques: remember to soak the plank for at least an hour, more if you have the time. You should get a few rounds of grilling per plank so don’t throw them away. Remember to check your salmon for bones and you can serrate the flesh into portions to allow it to cook quicker. I also made a Ginger Maple glaze for the salmon (recipe below) but it isn’t needed.


Fuel


Salmon Fillet (1-2 lbs.)

Maple Syrup (1 Cup)

Lemon Juice (4 ounces)

Soy Sauce (3 Ounces)

Ginger (2 Tbs. minced)

Garlic (2 Cloves smashed)

Pepper and Salt

EVOO


Tools


Cedar Plank (8” x 24” is ideal)

Small Saucepan

Paint Brush

Fine Mesh Strainer


Tactics


Place the cedar plank in water and submerge for a minimum of an hour (4 hours being ideal). I used an empty trashcan and water hose but use what works best for you. Remove from water and wipe dry. Ignite grill and set to medium-high with a target temp of near 300°F. When the grill is heated, place the plank smooth side down and allow it to heat up for 3-5 minutes. Flip over, apply 1-2 Tbs. of EVOO on the smooth side, sprinkle pepper and salt on the plank and then place the salmon skin side down. Apply the glaze over the salmon and then cover to cook. Cook for 20-25 minutes (or until the fish flakes when gentle pressure is applied) continuing to apply additional glaze after 10 minutes and again when the salmon is removed from the grill. Allow the salmon to rest for a few minutes then serve immediately with the remainder of the glaze. Indulge!


Ginger Maple Glaze


Pour all ingredients into the saucepan and heat over medium heat until reduced by half, about 8-10 minutes. Place the glaze through a fine mesh strainer to remove the solids. Reserve till needed. 

1 Comment

Comment

Overnight Steel Cut Oatmeal

This is so easy, maybe even too easy. Simple ingredients, one pot, a few minutes of active cook time (really, 4-5 minutes, maybe) and you go to bed. Wake up the next morning at your leisure and warm up the pot, done. If you can boil water and place a lid on a pot, this is in your wheelhouse. And what is produced is so good that 12-year-old boys will eat it (the ultimate firefighter taste test focus group). People, I give you overnight steel cut oatmeal like you’ve never had it, this is good.


When oatmeal comes to mind, thoughts of rolled, soggy oats that taste as well as it sounds filter into one’s mind. Over filled with expired cinnamon, dried out brown sugar, and fake butter is the norm for the fire service (sad but true). I wanted to provide a tasty, healthy alternative and prove that oats can have a place in the firehouse breakfast pantheon (pancakes, scrambled eggs, grits, toast, sausage, and bacon).


Know I have a soft spot for oatmeal for all the Quaker microwavable packets I ate as a youth on the go to school. But there is just something magical about steel cut oats (AKA: Irish/Scottish/Pinhead Oats). They retain some much-needed texture that makes one think of Irish/Scottish style porridge or Italian risotto. Nutty and chewy, they provide a great vehicle to top with a plethora of fresh or dried ingredients. Indulge.


Fuel


Water (3 cups)

Steel Cut Oatmeal (1 cup)

Buttermilk (½ cup = 1-2 Tbsp.)

Milk (½ cup)

Unsalted Butter (1 Tbsp.)

Sugar (1 Tbsp.)

Salt (½-1 tsp.)


Tools


Dutch Oven or similar

Spoon, spatula or similar


Tactics


Place the Dutch oven over medium heat and add the butter. Melt then lightly brown the butter, 1-2 minutes. Place the oatmeal in and toast till a nutty aroma hits the nostrils. Add the water, milk, buttermilk, and salt and bring to a boil. Add the oatmeal, stir once and lower to a low boil for 1 minute. Remove from heat, cover with lid and go to sleep.


In the morning, return the Dutch oven to low-medium heat till warmed throughout. Add the sugar and enough liquid (water/milk) to reach your desired consistency if desired. Provide a buffet style offering of toppings from fresh/dried fruit, nuts, granola, sugar in any form (maple syrup, agave, turbinado, etc.), peanut/almond butter (it’s kinda cool), etc. when serving for the masses.


A few after the fire critiques: I removed ¼ of the oatmeal and added quinoa and it was fantastic. This can easily be made the same morning and there is many a recipe for that on the internet (expect 30-40 minutes) with the same ingredients. FYI, doubling the recipe made enough for 10 people (probably 7-8 FFs) with some sides (eggs, toast, fresh fruit).  This was too easy and may not challenge enough those wanting to make a mess in the morning in hopes of making the crew do a lot of dishes. 

Comment

1 Comment

Mexican Tortilla Soup

As I stood framing the window in my firehouse kitchen contemplating the night’s dinner, I watched the fellas bring the rigs around in the freezing cold. The south, know for it’s sweltering heat and humidity during the summertime surprises many with it’s bitter bite of winter. And I cannot deny that weather plays a large part on where my action plan for food drives me and considering my brethren and I where exposed to the elements during most of it, soup was the call of the day.


Given the near freezing temps and busy work schedule of the day, I usually go towards a hearty soup. Being inexpensive is just one of the bonuses (this entire meal cost less then the steak one of my rookies paid for the shift previously) as they’re also filling, healthy and too easy.  My California roots will often drive me towards Latin flavors so Mexican Tortilla Soup came to mind.


A few after the fire critiques: Some will preach adding tortillas to the soup to thicken it up, and I have, in other iterations, but I enjoy this consistency more.  The chicken can be substituted with shredded pork. For a different take, consider adding fire-roasted tomatillos in place of the tomatoes. And yes, I always prefer fresh ingredients versus canned but in the case of corn, they’re out of season so canned or frozen are preferred. Indulge.


Fuel


      Chicken breasts or thighs (4-6)

Onion (chopped)

Celery (4 stalks, chopped)

Carrots (4 carrots, chopped)

Garlic (4 cloves, minced)

Chicken stock (2½ quarts)

Fire-roasted tomatoes (1 can)

Black Beans (1 can, rinsed)

Corn (1 can)

Jalapeno (2-3, seeded and minced)

Cumin (1 tsp.)

Coriander (1 tsp.)

Cilantro (¼ bunch, chopped)

Tortillas (6 cut lengthwise into ½” strips)

Olive oil

Pepper and Salt


Optional


            *Avocado

            *Crema/sour cream

            *Cheddar cheese


Tools


            Dutch oven

            *Small Skillet for frying (optional)


Tactics


  1. Preheat the oven to 350°F
  2. Place the chicken breasts/thighs skin side up on a sheet pan. Rub with olive oil, sprinkle with salt and pepper, and roast for 35 to 40 minutes, until done. When the chicken is cool enough to handle, discard the skin and bones, and shred the meat. Cover and set aside.
  3. Meanwhile, heat 3 Tbsp. of olive oil in a large pot or Dutch oven. Add the onions, celery, and carrots and cook over medium-low heat for 10 minutes, or until the onions start to slightly brown. Add the garlic, cumin and coriander and cook for 30 seconds. Add the chicken stock, tomatoes, corn, black beans, jalapenos, 1 Tbsp. salt (depending on the saltiness of the chicken stock), 1 tsp. pepper, and the cilantro, if using. Cut the tortillas in half, then cut them crosswise into ½-inch strips and add to the soup. Bring the soup to a boil, then lower the heat and simmer uncovered for 20-25 minutes. Add the shredded chicken and season to taste.
  4. *Optional: fry the tortillas in shallow oil over medium heat or serve with store bought tortilla chips


  • Consider when serving: sliced avocado, crema/sour cream, grated cheddar cheese and the fried tortilla chips

1 Comment

Comment

Nutella Mousse

Oh the holidays, how we love the. A chance of snow, a crackling fire in the hearth, corks popping off bottles… all things that we enjoy to get us in the holiday spirit and simultaneously ensures our job security. But alas, with all the family and friends coming and going, the demands on our time in the kitchen to produce end-of-year worthy dishes increases. Which leads me to potent but time reducing recipes such as my Nutella Mousse.


I always promote healthy living and recipes for my fellow firefighting brothers and sisters, but come on people, it’s the holidays so indulge. This is a decadent but light dessert that requires maybe 10 minutes of active prep as there is NO cooking, I mean it’s mousse. The espresso accentuates the chocolate flavor (something to note for your future recipes) but it’s not overwhelming. It allows the kids of the firehouse to play with a heavy rescue style tool and you can make it well ahead of its intended serving time. But perhaps most importantly, it has Nutella.


Fuel


Heavy Cream (2 Cups)

Nutella (½-⅔ Cup)

Vanilla (1 tsp.)

Espresso or Finely Ground Coffee (¼ tsp.)

Salt (¼ tsp.)


Toppings


Whipped Cream (1 Cup, home made preferred)

Toasted Nuts (¼ Cup chopped or Tbsp. powdered)


Tools


Stand Mixer with Whisk Attachment

Re-sealable Container (if needed)


Tactics


In the bowl of the stand mixer with the whisk attachment on, place the heavy cream and espresso powder in and stir briefly to combine. Let the coffee steep for 5 minutes. Add the Nutella, vanilla and salt. Then using the mixer on its slowest setting, begin whipping the mousse. Begin slowly at first then gradually pick up speed until the mouse holds a soft peak when the whisk is removed. Depending ion the temp in your kitchen it can take anywhere from 5-10 minutes. Place the mousse in a re-sealable container or in individual serving vessels and store in the refrigerator for a minimum of 2 hours or up to over night. When ready to assemble, add some of whipped cream and top with toasted nuts. Enjoy.


A few after the fire critiques: Chilling the stand mixer bowl in the freezer for a few minutes before mixing aids in building the mousse. I added a layer of Nutella to my cups for some extra flavor and fun when scooping to the bottom. I just warmed the Nutella in the microwave till it was spreadable and spooned/poured it in. Remember though, a little goes a long way. Consider berries, other toasted nuts or coconut and/or a sprinkling of coco or cayenne powder on top as alternatives to the pistachio. Above all, have a Happy Holidays and a Happy New Year!

Comment

Comment

Pumpkin Soup

Pumpkins are the epitome of fall and it’s favorite holidays, Halloween and Thanksgiving. Scary faces and pumpkin pies are not the only things that they ‘re good at though. Like a good firefighter great at advancing a hose, don’t forget that they can force a door, stick an IV or clean the bay floor. Pumpkins are so much more then sweet; they can be savory and comforting. 


Now I admit that soup sounds as exciting as, well, cleaning the bay floor. But rest easy friends, this is not your average vegetable soup. The infusion of Chinese Five Spice (cinnamon, anise, cloves, ginger and Szechuan pepper), coconut cream and apple cider vinegar ensure a savory comfort food versus pumpkin pie in a bowl. Enjoy making it early between incidents and warm it up when ready for dinner, it doesn’t get easier then that. Served as a side (think Thanksgiving dinner folks!) or as a pairing with sandwiches for a meal, enjoy this quick and healthy soup to help warm up the crew on a cold fall day.


A few after the fire critiques: ensure that you get pumpkin puree and NOT pumpkin pie filling. Fell free to roast pumpkins in lieu of canned pumpkins if afforded the time and you want to entertain your rookies (or spouse/kids) with separating seeds from gourd. As the pumpkin is from the can (or in my case, box), the extra step of reducing on the stovetop is worth the effort. Making it early helps the soup come together throughout the day and it’s even better the next shift. Indulge!

Serves 4


Fuel


Pumpkin Puree (32 ounces)

Veggie Stock (32 ounces)

Carrot (1 cup shredded)

Coconut Cream (½ cup)

Onion (Chopped)

Garlic (clove minced)

Butter (2 Tbs.)

Chinese Five Spice (1 tsp.)

Apple Cider Vinegar (1 ½ Tbsp.)

Honey (1 Tbsp.)

Pepper and Salt


Optional


Sour Cream or Crema

Chives (minced)

Hot Sauce


Tools


Dutch Oven

Blender (Immersion if available)


Tactics


Place Dutch oven over medium-high heat. Add butter and allow it to slightly brown, about 2-3 minutes Add onion, carrots and Chinese Five Spice and cook until onions are translucent (about 5-8 minutes). Lower heat to medium and add pumpkin and cook to reduce water content (about 10 minutes).  You’ll need to stir on occasion so don’t go anywhere as you’re looking to slightly reduce (remember, we’re reducing moisture and strengthening flavor) and deepen the pumpkin color. Add stock then bring to a boil. Reduce heat to medium-low and return soup to a simmer. Add cream and allow it to simmer for 5 minutes. Reduce to low and allow the flavors to meld together for a minimum of 20 minutes. Carefully transfer the soup to a blender (it’s hot so take care or use an immersion blender if on hand, they’re awesome) and blend till a smooth consistency. Pepper and salt to taste. Consider serving with sour cream or Crema, chives and drops of hot sauce on top. Enjoy.


Stay low, stay safe and stay hungry!

Comment

1 Comment

Fire Engineering Article

I'm proud to announce that my first article with the prestigious Fire Engineering is now live! For those that are regular visitors of this site, this recipe will be familiar as we struggle with the last remnants of summer leaving us for the cool of fall but it's a good one. Very happy to be apart of the team contributing where I can for the Fire Service. I hope all is well and watch out for an out-of-the-box recipe for October around the corner. Hit the link below to be taken to Fire Engineering. Hope all is well!

Fire Engineering

Stay low, stay safe and stay hungry!

1 Comment

3 Comments

Firehouse Shepherds’ Pie

Sheperds' Pie Promo Pic.jpg

I often strive to provide inexpensive meals as we can all feel the pinch of lean financial times. At the firehouse, we Firefighters pool our money together to procure all things culinary including all our meals for our 24-hour shift. And like at home, we must maintain an active pantry, stocking up on all the essentials. So there are times when the money runs a little low. But as I’ve always looked to cut costs where possible, I never look to sacrifice taste.


Shepherd’s Pie has often been viewed as a peasant food, not a showcase meal, hearty though it may be. I approached this as a challenge, looking for ways to instill some added depth and flavor while using inexpensive staple items and different techniques. I tried to stay as honest to the original recipe but in an effort to keep costs down, I eliminated the ground lamb (that, and the fact that it is not readily available), finely shredded the carrots and used frozen peas. I like to break molds.


A few notes; when making the mashed potatoes, reserve salting them until after adding whatever cheese you decide to go with (some cheeses contain high levels of salt), the raw yoke that is added to the mashed potatoes is cooked in the oven so worry not, and beef broth can always be substituted for the red wine at the firehouse. 


Fuel


Ground Lamb (1 lbs.)

Carrots (2 large stalks shredded)

Onion (½ medium, shredded)

Peas (½ cups)

Garlic (2 cloves, shredded)

Red Wine (½ Cup, Pinot Noir)

Dried Porcini Mushrooms (1/2 Cup)

Worcestershire Sauce (2 Tbsp.)

Ketchup (2 Tbsp.)

Flour (¼ Cup)

Unsalted Butter (5 total; 3 Tbsp. cubed, 2 Tbsp. regular)

EVOO (2 Tbsp.)

Potatoes (2 large Yukon)

Aged White Sharp Cheddar Cheese (¾ Cup shredded)

Half-and-Half (½ Cup)

Egg Yoke

Pepper (white if you have it) and Salt


Tools


Cast Iron Skillet

6 x 4 ounces Cast Iron Ramekins OR Porcelain

Box Grater

Spice Grinder

Medium Pot

Potato Ricer OR Fine Mesh Drain

Spatula


Tactics


Add the potatoes, salt and enough water to cover it all in a medium pot and place over high heat to bring to a boil. Reduce to a simmer and cook for approximately 10 minutes or until fork tender. Drain then add back to the hot pan. Begin breaking down the potatoes via ricer/mesh while adding the butter, half-and-half, ½ cup of Cheddar, egg yoke, white pepper and salt. Mix to combine and reserve.


Using the spice grinder, grind the dried mushrooms to a fine powder. Reserve.


Meanwhile, preheat the oven to 350°F. Add the butter and EVOO into the cast iron pan over high heat. Add the lamb, season with salt and brown, 5-6 minutes. Once browned, add the flour. Mix to combine and continue to cook for an additional minute or until the raw flour taste is gone. Add the carrots and onion (grate them directly into the cast iron skillet), peas and garlic and cook an additional 2 minutes. Create a well in the middle of the pie and add the Worcestershire, powdered mushroom and ketchup then mix to combine. Add the wine/beef broth and cook until reduced. Test the filling at this time and add more liquid if necessary. Spoon the filling into the ramekins then add the potatoes by spooning small mounds to create a thin layer ensuring to cover the entirety of the ramekin. Cook in oven for 20 mins. Shred additional cheese to lightly cover the top. Place in a pre-heated broiler set for high for 1-2 minutes or until the top is lightly browned. Indulge.


*If time permits, consider adding small micro salad (Arugula or similar) to top or side with an emphasis on vinegar (i.e.- balsamic).


3 Comments

Comment

9/11 and 11 Alive Appearance

Let me first pay my respects to those that suffered this day so many years ago. We lost 343 that day, a number that will live in infamy, but so many others lost too. May we Never Forget, remain every vigilant and be thankful for the safety that we have today for those that paved way it's path. Thank you. 

Made an appearance on the local Atlanta 11 Alive when reporter Ryan Krueger came by to visit my firehouse for a follow up to talk about my appearance on NBC's Food Fighters, life as a firefighter and the September 11th anniversary. I wanted to thank Ryan and his work on this piece as well as his enthusiasm about the tools and vehicles at the firehouse and our lifestyle in general. It was refreshing to see. Here's a link to the video: 11 Alive

Comment

Comment

Chicken Again? Spice it up.

Need a way to alter the barren landscape that is chicken? This tried and true protein is an American staple but it has become synonymous with everything boring. Many a chef (and Frenchman) would heartily disagree but I see the average home cooks' dilemma. How many different ways can one bust down a door (obligatory firefighter reference)? Turns out a lot; the classic set of Irons, through the lock method, rabbit tool, rotary saw to the hinges or make a doggie door, etc. All that is needed is some imagination and some spices.

IMG_1191.JPG

Centuries ago, man pushed themselves to their limit and across the globe in pursuit of spices, turing the exotic into a real world commodity and helping shape societies worth and influence. Today, with the advent of local farmer's markets and this thing called the Internet, the availability of spices from around the world can be overwhelming. I have over a dozen different Indian spice mixes alone. Everything from Anise to Zatar and everything in between is there to be played with.

This particular spice mix was suggested from the iconic Ad Hoc at Home from Thomas Keller.

This particular spice mix was suggested from the iconic Ad Hoc at Home from Thomas Keller.

These are obviously nothing new as spice mixes and for dishes are common amongst all cultures. They are used for their ability in small doses to impart huge aroma and flavor, their typically low cost and availability and the diversity of different cooking techniques they can be used with. As they are often toasted and then ground, spices are more ideal then fresh herbs for higher temperatures and longer cooking times (AKA- more forgiving of absent minded or new cooks) too. 

Keep your spices in a dark, dry place and clearly labeled. 

Keep your spices in a dark, dry place and clearly labeled. 

Take hold of your internal Magellan and set to the high seas of the culinary playground and start exploring the wonderfully, diverse world of spices to take back the beauty of chicken and spice it up. 

Stay low, stay safe and stay hungry.

Comment